Sections
Overview
Picking is the step in the Outbound Order process where you select Materials to Ship for an Order, and assign them to a new Location in preparation for the Shipment. Cluster Picking allows you to group Pick Slips or Shipments together to minimize the amount of work required for Picking, collecting all like Materials or Picking all Materials from the same Location at once.
From here you can...
Pick Slip Clusters
This screen lists all created Pick Slip Clusters for the Mobile Device.
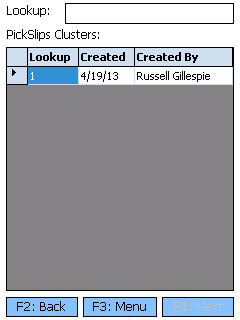
The Lookup field allows you to filter the displayed Pick Slip Clusters by LookUp Code.
Tapping F1: Next or pressing the F1 key takes you to the Build Pick Slip Cluster screen for the selected Pick Slip.
Tapping F3: Menu or pressing the F3 key displays a menu with three additional options:
- F4: New brings you to the Build Pick Slip Cluster screen in order to create a new Cluster.
- F5: Refresh refreshes the information displayed on the screen, filtered by any entered LookUp Code.
- F11: Inquiry opens the Inquiry Menu.
Tapping F2: Back or pressing the F2 key takes you back to the main menu.
| LookUp: | The Pick Slip Cluster LookUp Code. |
| Created Date: | The date on which the Cluster was created. |
| Created By: | The Footprint User who created the Cluster. |
Build Pick Slip Cluster
This screen allows you to create a Pick Slip Cluster by adding Pick Slips or Shipments to the Cluster, then confirming. If the Cluster has already been created, this screen displays all Pick Slips that are part of the Cluster. You can still add Pick Slips to a created Cluster.
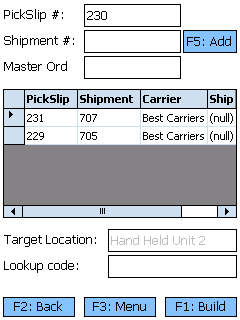
Scan or enter the Pick Slip Number, Shipment Number, or Master Order Number in the appropriate field, and tap F5: Add or press F5 to add all Pick Slips associated with the entered information to the list. If any relevant Pick Slips are already attached to another Pick Cluster, they will not be added.
The Target Location field displays the name of the Mobile Device you are using, which the Pick Cluster will be tied to.
Note
You must complete the Cluster Pick on this Mobile Device once it is created.
Tapping F1: Build/F1: Next, or pressing the F1 key, confirms the listed Pick Slips and takes you to the Pick Tasks screen for execution of the Cluster.
Tapping F3: Menu or pressing the F3 key displays a menu with three additional options:
- F4: Remove PickSlip removes the selected Pick Slip from the Cluster.
- F5: Search refreshes the information displayed on the screen, filtered by the entered parameters.
- F11: Inquiry opens the Inquiry Menu.
Tapping F2: Back or pressing the F2 key discards the selected Pick Slips, and takes you back to the Pick Slip Cluster screen.
| Pick Slip: | The LookUp Code of the added Pick Slip. |
| Shipment: | The ID number of the added Shipment. |
| Carrier: | The Carrier making the delivery. |
| Ship On: | The date on which the Shipment is scheduled. |
Pick Tasks
The Pick Tasks screen allows you to select which Pick Tasks from the Pick Slip you'd like to perform.
Scanning or entering a Location or Material filters the displayed Tasks by that Location or Material.
Tapping F1: Next or pressing the F1 key allows you to Pick the selected Task on the Cluster Pick screen.
Tapping F2: Back or pressing the F2 key takes you back to the Build Pick Slip Cluster screen.
| Source Location: | The Location of the Materials to be Picked. |
| Material: | The LookUp Code of the Material. |
| Quantity: | The number of Packages of the Material to be Picked. |
| UOM: | The packaging Type of the Material to be Picked. |
| Lot: | The Material's Lot. |
Cluster Pick
The Cluster Pick screen is where you confirm the Materials you are Picking, where they are coming from, and where they are going.
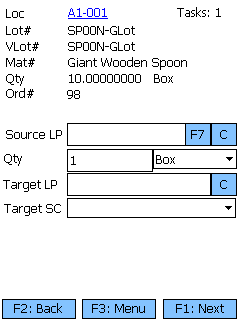
Basic information about what and where you are Picking is displayed at the top of the screen.
In the center of the screen is where you enter or scan all Pick information.
The Target Location for the Pick is displayed underneath the list, showing the Mobile Device you are using.
Tapping F1: Next or pressing the F1 key confirms the Pick for all selected Pick Slips.
Tapping F3: Menu or pressing the F3 key displays a menu with three additional options:
- F5: Move LP opens the Move LP screen.
- F6: Inventory Move opens the Move Inventory screen.
- F7: Select Src LP allows you to select a Source LP for your pick from a list of potential License Plates (each containing the relevant Material).
- F8: Reallocate opens the Reallocation screen.
- F9: Missing LP opens the Missing License Plate screen.
- F11: Inquiry opens the Inquiry Menu.
- F12: Task Notify allows you to crate a Task Notification and enter a message.
- Pick Drop opens the Pick Drop screen.
- Source CT allows you to define the Container Type for the Source License Plate.
- Target CT allows you to define the Container Type for the Target License Plate
- Cancel Task lets you Cancel the Pick Task.
- Next Task opens the next Pick Task in the Pick Cluster for completion, without completing the current Task.
- Prev. Task opens the previous Pick Task in the Pick Cluster for completion, without completing the current Task.
- Capture Temp allows you to take a Temperature Capture reading.
- View Material Details displays the Material Inquiry results screen for the current Material.
- F4: Confirm and Load Confirms the Pick and takes you directly to the Load screen.
Tapping F2: Back or pressing the F2 key takes you back to the Pick Tasks screen.
*Those in red are required fields.

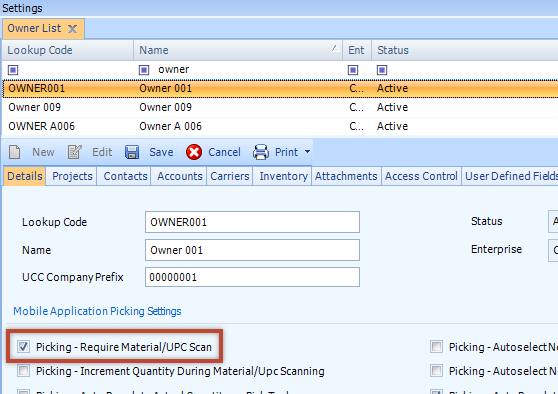
When performing a Cluster Pick for a material belonging to an Owner that has the Picking - Require Material/UPC Scan setting active, there will be an additional field below the Source LP where the user will be required to scan the Material or UPC upon picking, as seen below.
Pressing the F8 key allows you to Reallocate the Materials, using a different Source Location for the Materials.
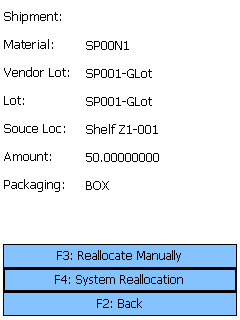
Tapping F3: Reallocate Manually or pressing the F3 key allows you to choose the Source Location for the Materials.
Tapping F4: System Reallocation, or pressing the F4 key has the system choose a new Source Location for the Materials.
Tapping F2: Back or pressing the F2 key takes you back to the previous screen.
| Shipment: | The Shipment for the Materials to be Reallocated, if applicable. |
| Material: | The Material to be Reallocated. |
| Vendor Lot: | The Vendor Lot for the Materials to be Reallocated. |
| Lot: | The Lot for the Materials to be Reallocated. |
| Source Loc: | The current Source Location from which the Materials have been Allocated. |
| Quantity: | The number of Packages of the Material to be Reallocated. |
| Packaging: | The Packaging Type for the Materials to be Reallocated. |
Tapping F1: Next or pressing the F1 key completes the Reallocation, changing the Source Location.
Tapping F2: Back or pressing the F2 key takes you back to the previous screen.
| Location: | Enter the new Source Location from which the Materials will be Allocated. |
| Material: | The Material to be Reallocated. |
| Lot: | The Lot for the Materials to be Reallocated. |
| Vendor Lot: | The Vendor Lot for the Materials to be Reallocated. |
| Amount: | The number of Packages of the Material to Reallocate. The Packaging Type is displayed next to the field. |
*Those in red are required fields.
The Report Missing License Plate screen allows you to enter a License Plate LookUp Code for the missing License Plate, and select a Reason Code for why it's missing. Both fields are required.
Pressing the F3 key allows you to perform a Pick Drop, which unloads License Plates assigned to the Mobile Device to a specified Location.
Scan or enter the Location at which you are dropping off the License Plate in the Target Loc field.
Tapping F1: Next or pressing the F1 key confirms the Pick Drop for the selected License Plate.
Tapping F2: Back or pressing the F2 key takes you back to the previous screen.
| LP #: | The License Plate LookUp Code. |
| Count: | The number of unique Materials on the License Plate. |
| UOM: | The Packaging Type for the Materials on the License Plate. |
Opening the Capture Temp. screen allows you to record temperature readings for the operation, and tie them to the Shipment or License Plate.
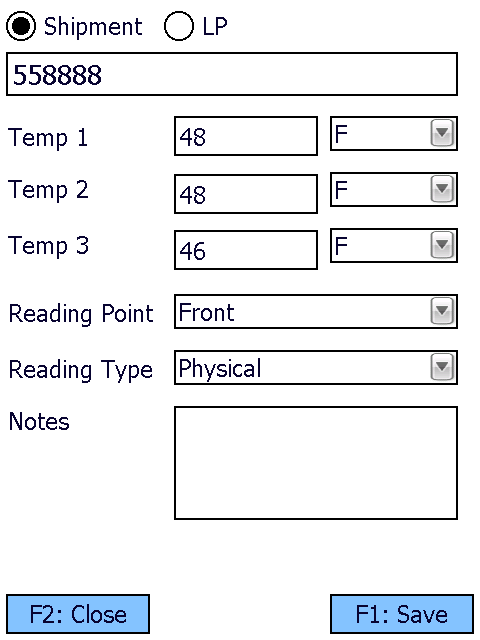
Selecting Shipment or LP determines whether the Temperature Capture information will be associated with the Shipment or the License Plate in question. The field below this choice will be automatically populate from the previous screen, but can be overwritten to assign the capture to whichever Shipment or License Plate you'd like.
You can enter up to three Temperature Readings, and select whether the temperature was recorded in Fahrenheit or Celsius.
The Reading Point and Reading Type can also be chosen for the reading, further specifying information by selecting from various customizable options configured on the Desktop.
Additional Notes can be recorded for the reading.
Tapping F1: Save or pressing the F1 key saves the temperatures entered for the chosen Shipment or License Plate. Additional Temperature Readings can be recorded.
Tapping F2: Close or pressing the F2 key closes the Temperature Capture screen, returning you to the previous screen. Any unsaved changes are discarded.
Serial Number Pick
If the Materials you are Picking are Serialized, or have Variable Weight or Dimensions, you will be brought the Serial Information screen once you Confirm Picking.
At the top of the screen is the SN field in which you scan or enter the Serial Number you have selected. Underneath this field is displayed the total Required amount of Serial Numbers, the amount of Serial Numbers already Selected, and the Total amount of Serial Number available to choose from.
The list pane on the upper half of the screen shows all available Serial Numbers. The list pane on the lower half of the screen shows all selected Serial Numbers.
Pressing the F4 key changes the goal of the screen, scanning the Serial Numbers you are not choosing rather than those you are. This is good for situations where you will be selecting more than half of the Serial Numbers that are available here.
Pressing the F5 key loads the most current information for the lists.
Pressing the F8 key automatically chooses the Required amount of Serial Numbers for you. Be sure to check this against the Serial Numbers of the Packages actually chosen in your Warehouse.
Pressing the F9 key deselects all Serial Numbers previously selected, clearing the bottom list pane.
Tapping F1: Accept or pressing the F1 key confirms all Serial Numbers selected.
Tapping F2: Cancel or pressing the F2 key takes you back to the previous screen.
| Serial #: | A unique Serial Number to identify the item. |
| Net: | The Net Weight of the item, without its Packaging. This box should be filled out for variable weight Materials. |
| Gross: | The Gross Weight of the item, including their Packaging. This box should be filled out for variable weight Materials. |
| Length: | The Length of the item. This box should be filled out for variable weight Materials. |
| Height: | The Height of the item. This box should be filled out for variable weight Materials. |
| Width: | The Width of the item. This box should be filled out for variable weight Materials. |
| Last Updated: |
| 06/06/2025 |
Related Concepts
Copyright © 2025 Datex Corporation